Imagine waking up at your friend’s house, camping in the wilderness, or facing a broken coffee maker on a Monday morning. You need your caffeine fix, but there’s no machine in sight. Don’t panic—learning how to brew coffee without a coffee maker is easier than you think. For centuries, people enjoyed exceptional coffee long before modern machines existed.
This comprehensive guide reveals professional techniques that deliver rich, flavorful coffee using simple kitchen tools. Whether you’re traveling, camping, or simply prefer minimal equipment, these methods will transform you into a resourceful coffee enthusiast who never goes without their morning brew.
Understanding Coffee Brewing Basics
Before diving into specific brewing methods, you need to grasp the fundamental principles that separate exceptional coffee from mediocre brews. These core concepts apply universally, whether you’re using a $5,000+ espresso machine or a simple pot on your stove. Mastering these basics ensures consistent, delicious results every time you brew.
What Makes Great Coffee
The foundation of excellent coffee rests on three essential elements: proper coffee-to-water ratio, ideal temperature, and correct extraction time. Most coffee experts recommend using one to two tablespoons of grounds per six ounces of water.
Water temperature should hover between 195°F and 205°F—hot enough to extract flavors but not so hot that it scalds the grounds. Extraction time varies by method but typically ranges from two to five minutes.
Choosing Your Coffee Beans
Fresh, quality beans make all the difference in your final cup. Always select beans roasted within the past two weeks, as coffee loses approximately 80% of its aromatics within days of roasting. Medium to coarse grinds work best for most manual brewing methods. If possible, grind your beans immediately before brewing to maximize flavor and aroma release.
Method 1 – The Cowboy Method
What You’ll Need
This rustic technique requires only basic supplies: a pot or saucepan, water, coarsely ground coffee, and a heat source. Optionally, keep a ladle or strainer nearby for serving. A pinch of salt can also reduce bitterness if desired.
Step-by-Step Instructions
- Start by measuring your water—use slightly more than your desired coffee amount since some evaporates during boiling.
- Add 1-2 tablespoons of coarsely ground coffee per cup into your pot.
- Place the pot over medium-high heat and bring the mixture to a rolling boil.
- After it boils, reduce the heat and let it continue for two minutes, stirring occasionally to prevent the grounds from sticking to the sides.
- Remove the pot from the heat and let it sit undisturbed for four to five minutes. This resting period allows the grounds to settle naturally at the bottom.
- When ready to serve, pour slowly and gently into your mug, leaving the last bit with settled grounds in the pot.
Pro Tips
Add a tiny pinch of salt to your grounds before brewing to neutralize bitterness. For cleaner cups, try the “cold water trick”—pour a small amount of cold water across the top after brewing to help grounds sink faster.
Avoid stirring once you’ve removed the pot from the heat, as this disturbs settled grounds and creates a grittier drink.
Read: How to Make Concentrated Cold Brew Coffee
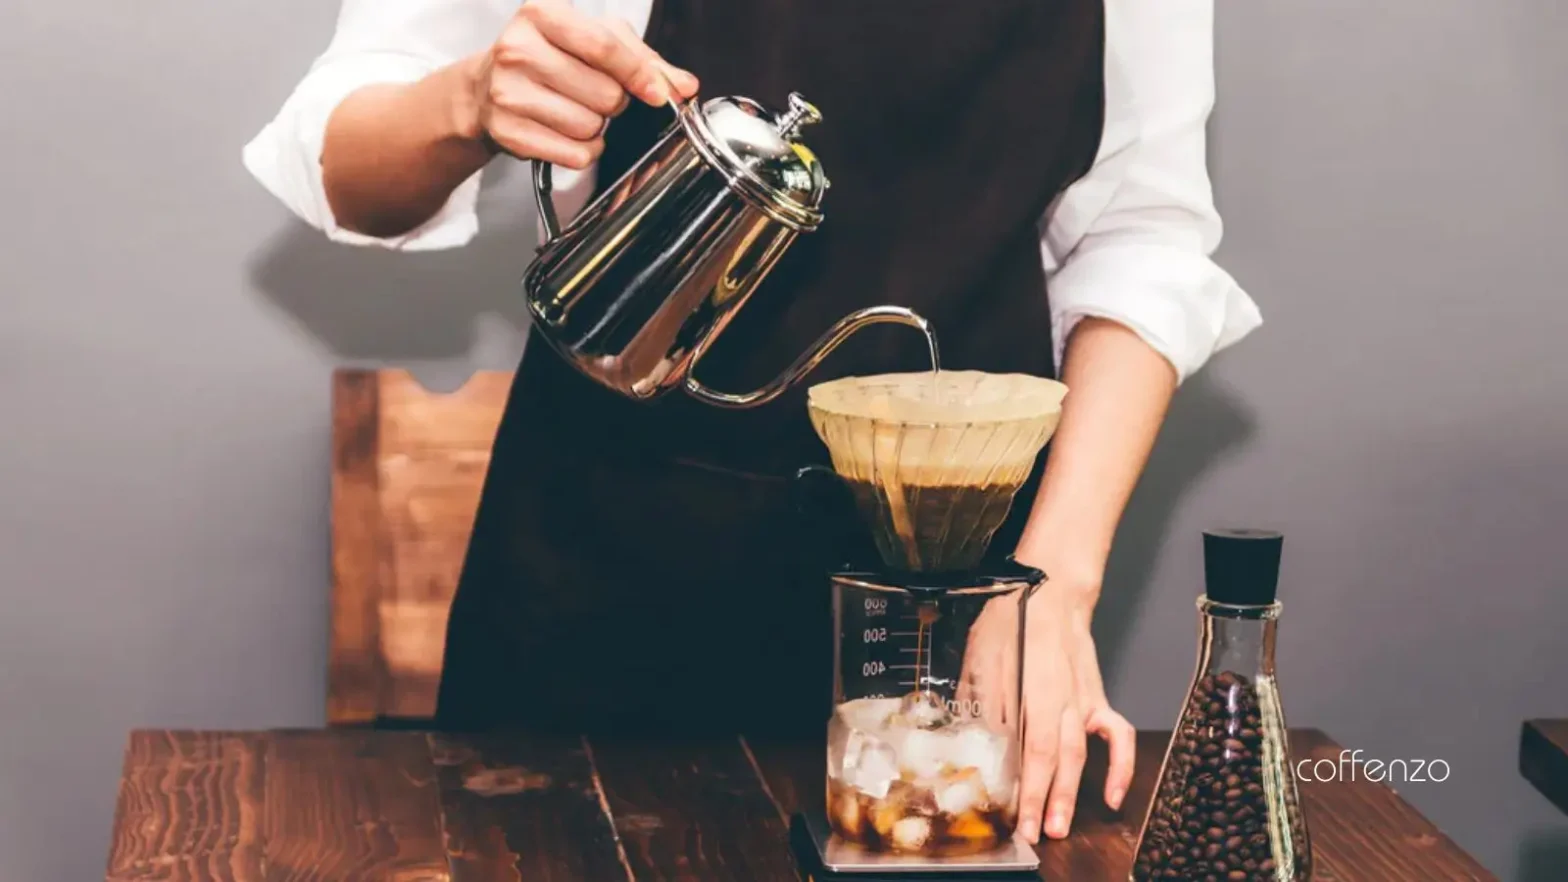
Method 2 – The Pour Over Method (Improvised)
What You’ll Need
You’ll need a coffee filter (paper or cloth), coffee grounds, hot water just off the boil, and something to support your filter over your mug. Clothespins, rubber bands, or even your hands can secure makeshift filter setups. A kettle or pot for heating water completes your toolkit.
Step-by-Step Instructions
- Place your filter over your coffee mug and secure it firmly with clips or bands, creating a small depression in the center.
- Rinse the filter with hot water to remove any paper taste and preheat your mug, then discard this water.
- Add 2-3 tablespoons of medium-ground coffee to the filter’s center.
- Boil water and let it rest for 30 seconds to reach optimal temperature. Pour just enough water to saturate the grounds—about twice their weight—and wait 30 to 45 seconds for “blooming.” This releases trapped carbon dioxide and enhances flavor extraction.
- Slowly pour the remaining water in circular motions over the grounds, taking about two minutes total for the complete pour.
Pro Tips
The “bloom” phase is crucial—never skip this step, even when rushed. Pour water in a slow, steady spiral from center to edge for even extraction. If your makeshift setup drips too slowly, your grind might be too fine; if it drips too fast, try a finer grind or pour more slowly.
Method 3 – The Mason Jar/Cold Brew Method
What You’ll Need
This method requires a Mason jar or any heat-safe container with a lid, coarsely ground coffee, cold or room-temperature water, and 12 to 24 hours of patience. A fine-mesh strainer or cheesecloth helps with filtering after steeping.
Step-by-Step Instructions
- Combine one cup of coarsely ground coffee with four cups of cold water in your jar.
- Stir thoroughly to ensure all grounds are fully saturated, then seal the lid tightly.
- Let the mixture steep at room temperature for 12 to 18 hours—longer for a stronger flavor, shorter for a milder taste.
- After steeping, strain the mixture through a fine-mesh sieve or cheesecloth into a clean container.
- You may need to strain twice for a cleaner result. The concentrated coffee can be diluted with water or milk to taste and served over ice or heated for hot coffee.
Pro Tips
Cold brew concentrate stays fresh in the refrigerator for up to two weeks when properly stored. Room temperature brewing extracts fuller flavors faster than refrigerator brewing.
Experiment with different coffee origins—African beans create brighter, fruitier cold brew while South American beans produce chocolatey, nutty profiles.
Method 4 – The Strainer/Filter Method
What You’ll Need
Gather a heat-proof bowl or large mug, coffee grounds, boiling water, and a fine-mesh strainer or coffee filter. A spoon for stirring and pressing grounds completes your setup. This method works brilliantly when how to brew coffee without a coffee maker becomes an urgent morning necessity.
Step-by-Step Instructions
- Place two tablespoons of medium-fine ground coffee in your heat-proof bowl for each cup you’re making.
- Boil water and let it cool for 30 seconds, then pour a small amount over the grounds to saturate them completely.
- Wait one minute for this initial bloom, allowing gases to escape and flavors to develop.
- Add the remaining hot water—about six to eight ounces per serving—and stir gently. Let the coffee steep for four to five minutes, depending on your strength preference.
- Position your strainer over your serving mug and carefully pour the coffee through, using a spoon to press down on the grounds in the strainer to extract maximum liquid.
Pro Tips
This method produces results similar to French press coffee. For extra smooth coffee, strain twice—once through a coarse strainer, then again through a paper filter. The pressing action at the end extracts fuller body and oils that contribute to a rich mouthfeel.
Common Mistakes to Avoid
Using water that’s too hot scorches coffee grounds, creating bitter, unpleasant flavors—always let boiling water rest 30 seconds before brewing.
Conversely, water below 195°F under-extracts coffee, producing weak, sour-tasting results. Improper coffee-to-water ratios rank among the most common errors—too much coffee wastes beans and creates overwhelming bitterness, while too little yields disappointing, watery drinks.
Rushing the brewing process shortchanges flavor development. Each method requires specific timing for optimal extraction. Skipping the bloom phase in pour-over methods leaves flavor trapped in the grounds.
Stirring or disturbing coffee after the grounds settle reintroduces sediment into your cup, creating an unpleasant, gritty texture.
Using stale or pre-ground coffee dramatically reduces quality. Coffee grounds lose aromatic compounds within 15 to 20 minutes of grinding. Pre-ground coffee sitting in bags for weeks or months tastes flat and one-dimensional compared to freshly ground beans.
Enhancing Your No-Maker Coffee Experience
Elevate your manual brew with thoughtful additions and techniques. A pinch of cinnamon, cardamom, or vanilla added to grounds before brewing infuses subtle aromatic complexity.
Natural sweeteners like honey, maple syrup, or agave nectar complement coffee’s inherent flavors better than refined sugar.
For creamy indulgence, try frothing milk alternatives like oat milk or almond milk—simply shake warm milk vigorously in a sealed jar for 30 seconds. Quality matters even in additions—use filtered water, real cream rather than artificial creamers, and high-quality sweeteners.
Presentation enhances enjoyment. Serve your manually brewed coffee in a preheated mug to maintain optimal temperature longer. Consider the occasion—how to brew coffee without a coffee maker becomes an impressive skill when you craft café-quality drinks for guests using only basic tools.
Conclusion
Mastering how to brew coffee without a coffee maker empowers you with versatile skills that work anywhere, anytime. From the robust simplicity of cowboy coffee to the smooth sophistication of cold brew, each method offers unique advantages for different situations.
These techniques prove that excellent coffee depends more on understanding fundamentals than owning expensive equipment.
The next time your coffee maker breaks, you’re camping under stars, or you’re visiting friends without machines, you’ll confidently craft delicious coffee using minimal tools.
Remember that the best coffee comes from fresh beans, proper temperatures, correct ratios, and patience during brewing. Start experimenting with these methods today—you might discover you prefer the hands-on ritual of manual brewing over automated convenience.
Frequently Asked Questions
Can I use regular ground coffee instead of coarse ground when learning how to brew coffee without a coffee maker?
Yes, you can use regular ground coffee, but coarse grounds work best for most manual methods. Finer grounds create more sediment in your cup and can over-extract, producing bitter flavors. If you only have regular or fine grounds, reduce steeping time by 30 to 60 seconds and pour very carefully to minimize sediment transfer.
What temperature should water be for brewing coffee without a machine?
Ideal brewing temperature ranges from 195°F to 205°F. Without a thermometer, simply bring water to a rolling boil, then let it rest for 30 seconds. This cooling period brings water to the perfect temperature for extracting coffee’s flavors without scorching the grounds or creating bitter, burnt tastes.
How long does coffee stay fresh when brewed manually?
Freshly brewed coffee tastes best within 30 minutes of preparation. After this window, oxidation diminishes flavor and aroma noticeably. Cold brew concentrate, however, stays fresh in the refrigerator for up to two weeks when stored in an airtight container, making it more convenient for batch preparation.
Can I make multiple cups at once using these methods?
Absolutely! Scale up any method by maintaining the proper coffee-to-water ratio of one to two tablespoons per six ounces of water. The cowboy method works particularly well for brewing larger batches in a pot. For cold brew, simply double or triple all ingredients while keeping the 1:4 coffee-to-water ratio consistent.
Do I need special coffee beans for manual brewing methods?
No special beans are required, but freshly roasted, high-quality beans dramatically improve results regardless of brewing method. Look for beans roasted within the past two weeks and grind them just before brewing for maximum flavor. Medium roasts work well across all manual methods, while light roasts shine in pour-over techniques and dark roasts excel in cowboy coffee.
Related posts:
How to Make the Best Coffee in a Percolator
Tuesday January 20, 2026What is the Difference Between Decaf and Regular Coffee?
Saturday January 10, 2026Coffee to Water Ratio: The Secret to Brewing a Perfect Cup
Sunday May 17, 2026Cortado vs Latte: Helping You to Make the Right Decision
Tuesday March 10, 2026Cortado vs Cappuccino vs Latte: Which Espresso Drink is Right for You?
Sunday March 22, 2026Cortado vs Cappuccino: What's the Real Difference?
Thursday March 19, 2026How to Brew Specialty Coffee at Home: Your Complete Guide
Saturday February 14, 2026Blonde Espresso: Caffeine Content and Why You Should Try It
Tuesday April 14, 2026Coconut Oil in Coffee: Benefits & How to Make It
Monday January 26, 2026
Hi,
I’m Wycléf NY, a certified barista with 6 years of experience (as of December 2025).
I started this website to share my coffee preparation insights with aspiring coffee enthusiasts and interact with fellow baristas.
Let’s catch up over a cup of iced Coffénzo coffee or shoot me a quick short message text (sms) at ny@coffenzo.com